95V3-1.jpg)


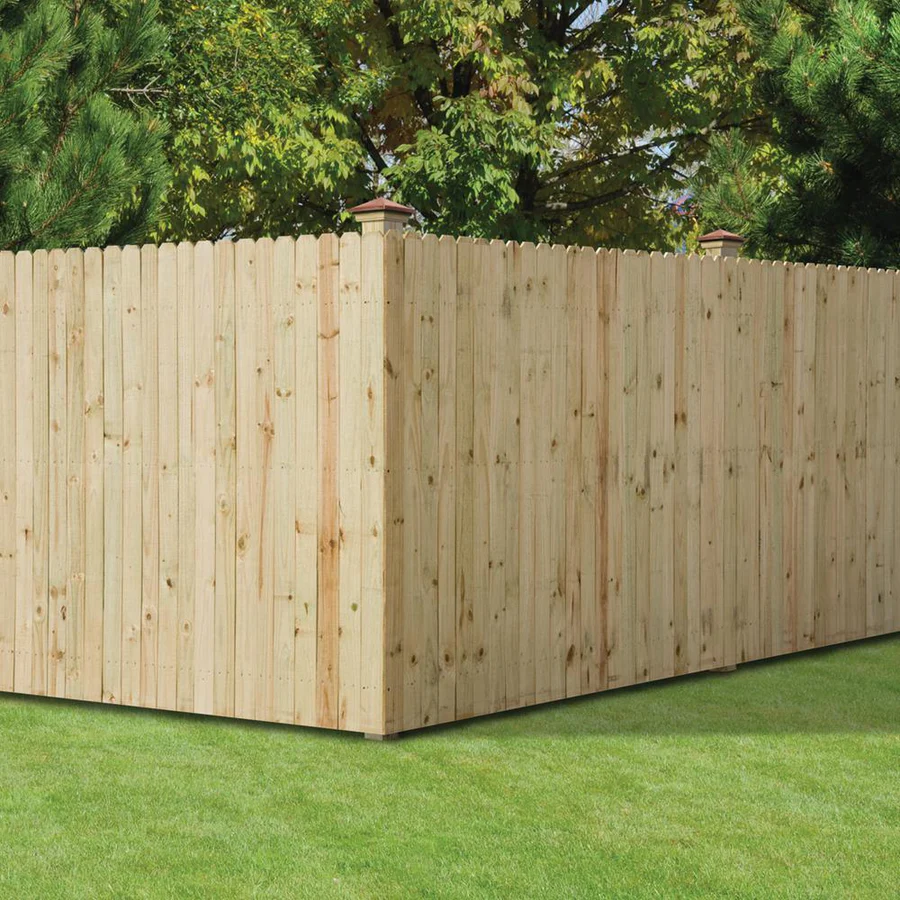
A 6-foot treated picket fence is one of the most popular projects we see around Memphis—and for good reason. It adds privacy, security, and curb appeal without breaking the bank.
If you’ve got basic tools and a weekend, you can build one yourself. Here’s how to do it right the first time.
Materials You’ll Need
Posts & structure:
- 4x4 pressure treated posts (8 ft)
- 2x4 pressure treated rails
- Concrete mix
Browse everything you need in our
Lumber & Building Materials
Fence boards:
- 6' pressure treated pickets
Hardware:
- Exterior screws or galvanized nails
Tools:
- Post hole digger
- Level
- Drill or nail gun
Shop Fence Materials
Get Your Materials Here
Step 1: Lay Out Your Fence Line
Mark your fence line with stakes and string.
- Keep the line tight and straight
- Mark post spacing every 6–8 feet
Fence Layout Example


Pro tip: A straight layout makes the entire fence look professional.
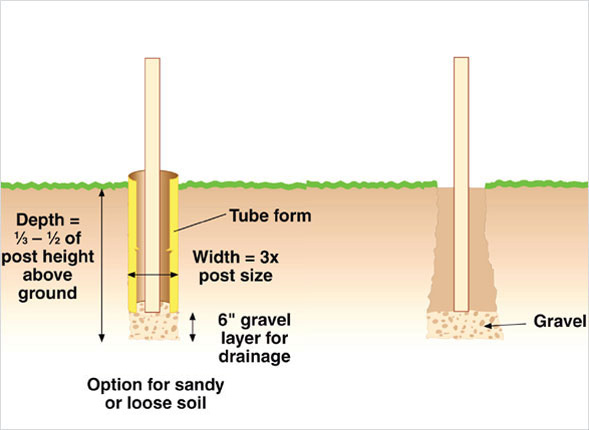
Step 2: Set Your Posts
This is the most important part of the project.
- Dig holes 2–3 feet deep
- Set posts in concrete
- Check level and alignment
- Let cure 24 hours
Need help estimating posts and concrete? Stop by—we’ll calculate it for you.
Setting Fence Posts

Step 3: Install Rails
Attach horizontal 2x4 rails between posts.
- Use 2–3 rails per section
- Use exterior-rated fasteners
- Keep everything level
Find all framing lumber in our
Lumber & Plywood
Installing Fence Rails


Step 4: Install Pickets
Now the fence comes together.
- Start at one end
- Keep tops level
- Nail or screw into rails
- Use consistent spacing
Buying in bulk? Ask about our
Contractor Charge Accounts
Installing Fence Pickets


Step 5: Trim and Finish
- Trim tops if needed
- Add a cap board (optional)
- Let wood dry before staining
Need specialty items? Use our
Special Order Program
Mistakes to Avoid
We see these all the time:
- Posts set too shallow
- Skipping concrete
- Using untreated wood
- Crooked layout lines
- Wrong fasteners (they rust fast)
Pro Tips
- Pressure treated wood is wet when you buy it—let it dry before sealing
- Always use galvanized or coated fasteners
- Don’t cheap out on posts—that’s your foundation
Cost Considerations
A treated wood fence is one of the most cost-effective options available.
Your cost depends on:
- Fence length
- Material quality
- Hardware
We’ll help you stay on budget without cutting corners.
Ready to Get Started?
Build It Right the First Time
Get all your fence materials in one stop.
Bottom Line
A 6' treated picket fence is a straightforward project—but only if you:
- Start with the right materials
- Take your time on layout and posts
- Don’t cut corners
Build it once. Build it right.
Serving Memphis Homeowners & Contractors
At Youngblood Builders Supply, we stock everything you need for fencing, decking, and full remodels—and we’ll help you get it right the first time.
Stop by and let’s get your project started.
A 6-foot treated picket fence is one of the most popular projects we see around Memphis—and for good reason. It adds privacy, security, and curb appeal without breaking the bank.
If you’ve got basic tools and a weekend, you can build one yourself. Here’s how to do it right the first time.
Materials You’ll Need
Posts & structure:
- 4x4 pressure treated posts (8 ft)
- 2x4 pressure treated rails
- Concrete mix
Browse everything you need in our
Lumber & Building Materials
Fence boards:
- 6' pressure treated pickets
Hardware:
- Exterior screws or galvanized nails
Tools:
- Post hole digger
- Level
- Drill or nail gun
Shop Fence Materials
Get Your Materials Here
Step 1: Lay Out Your Fence Line
Mark your fence line with stakes and string.
- Keep the line tight and straight
- Mark post spacing every 6–8 feet
Fence Layout Example
Pro tip: A straight layout makes the entire fence look professional.
Step 2: Set Your Posts
This is the most important part of the project.
- Dig holes 2–3 feet deep
- Set posts in concrete
- Check level and alignment
- Let cure 24 hours
Need help estimating posts and concrete? Stop by—we’ll calculate it for you.
Setting Fence Posts
Step 3: Install Rails
Attach horizontal 2x4 rails between posts.
- Use 2–3 rails per section
- Use exterior-rated fasteners
- Keep everything level
Find all framing lumber in our
Lumber & Plywood
Installing Fence Rails
Step 4: Install Pickets
Now the fence comes together.
- Start at one end
- Keep tops level
- Nail or screw into rails
- Use consistent spacing
Buying in bulk? Ask about our
Contractor Charge Accounts
Installing Fence Pickets
Step 5: Trim and Finish
- Trim tops if needed
- Add a cap board (optional)
- Let wood dry before staining
Need specialty items? Use our
Special Order Program
Mistakes to Avoid
We see these all the time:
- Posts set too shallow
- Skipping concrete
- Using untreated wood
- Crooked layout lines
- Wrong fasteners (they rust fast)
Pro Tips
- Pressure treated wood is wet when you buy it—let it dry before sealing
- Always use galvanized or coated fasteners
- Don’t cheap out on posts—that’s your foundation
Cost Considerations
A treated wood fence is one of the most cost-effective options available.
Your cost depends on:
- Fence length
- Material quality
- Hardware
We’ll help you stay on budget without cutting corners.
Ready to Get Started?
Build It Right the First Time
Get all your fence materials in one stop.
Bottom Line
A 6' treated picket fence is a straightforward project—but only if you:
- Start with the right materials
- Take your time on layout and posts
- Don’t cut corners
Build it once. Build it right.
Serving Memphis Homeowners & Contractors
At Youngblood Builders Supply, we stock everything you need for fencing, decking, and full remodels—and we’ll help you get it right the first time.
Stop by and let’s get your project started.